How to learn AI video editing for free, without a paid course
A practical route to learning AI video editing for free: start from an edit you owe someone, pick one problem per week, and read free tiers as a map of each tool.

A practical route to learning AI video editing for free: start from an edit you owe someone, pick one problem per week, and read free tiers as a map of each tool.
You can learn AI video editing without paying for a course. The thing that decides whether the free route works is not which course you find but whether you attach every tutorial to an edit you already owe someone. Everything that follows, the order you learn tools, the footage you shoot, the feedback you chase, comes from that single decision.
What decides this
The course is never the bottleneck. The missing edit is. A paid course sells you a sequence of lessons that someone else designed, in an order that suits a syllabus. Your learning is not a syllabus. It is a loop, and the loop needs a job at the centre of it or it does not turn.
Most people searching for how to learn AI video editing for free are looking for the same thing: permission to start. They think the gate is knowledge. It is not. The free material on any editor is already more than you can absorb. The gate is having a piece of footage that has to be cut by a date, for a person who will watch it.
Once you have that, everything changes. You stop browsing tutorials and start searching for the one button that fixes the problem in front of you. The tutorial becomes a tool, not a curriculum.
So the question underneath all of this is not which editor. It is: what do you already owe someone?
Start from the edit, not the tool
Pick the footage and the deadline first, then the feature. Open your drive. Find something you shot that has never been cut. A family event, a trip, a test clip, a friend's small business. It does not need to be good. It needs to be yours and it needs a date.
Set the date yourself if nobody else will. A birthday, a Friday, a friend who agreed to watch it. The deadline is not decoration. It is the thing that converts a tutorial into practice.
Then, and only then, look at the footage and ask what is slow about editing it. Too much talking to transcribe? That is a subtitle job. Audio full of wind and traffic? That is a cleanup job. Shot wide for a screen that wants vertical? That is a reframe job. One feature, one problem, one week.
The step people get wrong here is starting with a tour. They watch a forty minute walkthrough of the whole application, feel briefly informed, open their own timeline, and freeze. A tour teaches you what exists. A problem teaches you what to reach for.
There is a second trap. Do not pick a piece you are precious about. If it is the film you have been circling for a year, you will polish instead of finish. Choose something you can afford to get wrong, because you will get it wrong, and that is the point.
The free tier is a syllabus
Read free tiers as a map of what each tool is for, not as a trial you have to convert. Every editor has a shape, and the free version usually reveals it.
DaVinci Resolve's free version is a full edit suite with colour and delivery inside it. That tells you it was built for finishing. CapCut's free tier is built for speed, short-form templates and captions, and it tells you that in about ten minutes. Premiere's trial sits inside a professional editing ecosystem, and the trial tells you that the tool expects you to already know what you are doing. Runway and Descript are not editors in that sense at all. They are feature shops: generative video on one side, transcript-driven editing and voice work on the other.
Premiere's trial is a fixed window. If you install it to "learn", you spend the window deciding, and it expires while you are still watching overviews. If you install it to finish one cut in the window, you learn what it actually is. The trial is not a course length. It is a deadline.
For a first week, Resolve's free version is the one I would open. Not because it is the easiest, but because it is the one where the edit, the colour and the export live in the same application, so every AI feature you learn sits inside a real workflow instead of beside it. CapCut is the better first week if your only deliverable is vertical social and you need captions tonight. Both are honest choices. Only one of them scales into a paid job.
So why Resolve, specifically?
Resolve is the spine
Because colour, cut and delivery are one place, the AI features land inside an edit rather than beside it. The whole point of learning an editor is not to collect buttons. It is to take footage in one end and put a finished piece out the other. Resolve is built around that sentence.
I cut and grade on DaVinci Resolve Studio. For a learner, the practical difference is that you are not learning three applications and stitching them together. You learn one, and the AI features, the subtitle tools, the audio work and the delivery settings all sit on the same project.
There is a cost to this. Resolve rewards patience and it punishes a weak machine. A modest laptop will run it, but only after you set the timeline resolution sensibly and stop trying to play back full-quality footage you do not need to see at full quality. Learn where those two settings live on day one. It will save you a week of thinking your computer is broken.
If your footage is 360, that goes to Insta360 Studio first. That is a different shape of work and it belongs in its own session, not inside your first edit.
Now the question that matters: where does the AI actually earn its keep?
Where AI actually earns its place
It earns its place at the bottleneck, and only there. These are the jobs on a real edit where the machine genuinely saves hours. Each one has a step people get wrong.
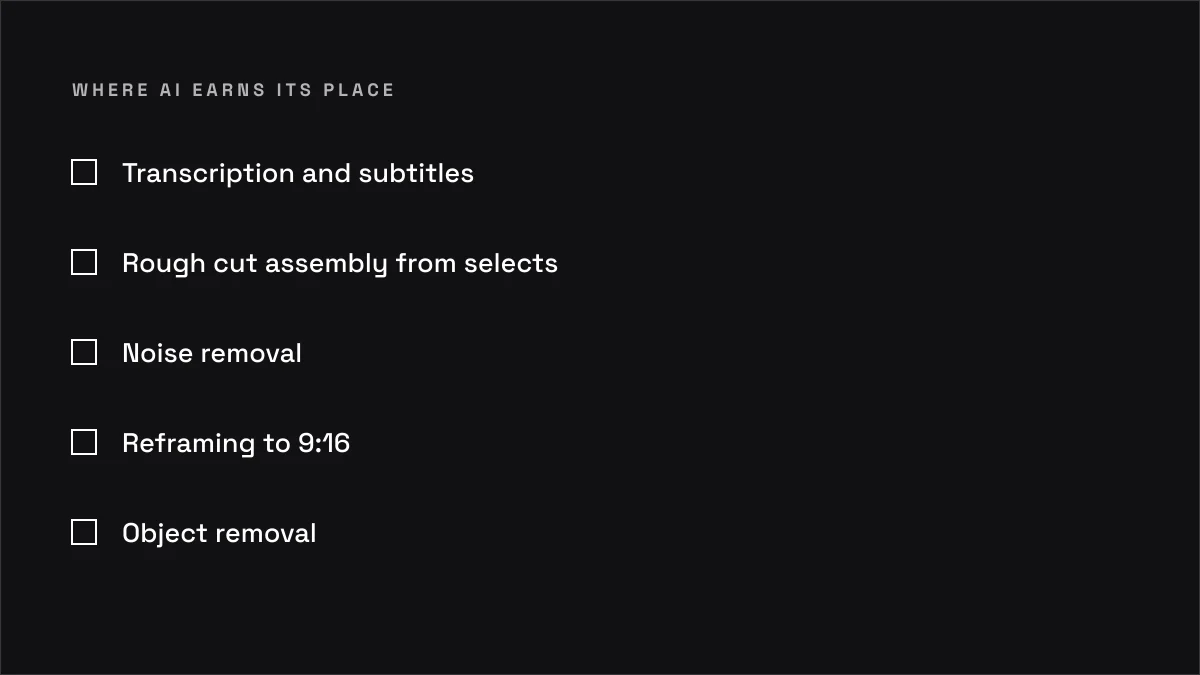
Transcription and subtitles. The AI listens and gives you a transcript with timing. The step people get wrong is accepting it without reading. It mishears names, numbers and accents, and a client will spot their own name spelled wrong before they notice your grade. Read the transcript before you export anything.
Rough cut assembly from selects. Feed it the takes and it proposes an order. The step people get wrong is treating the order as a decision. It is a first pass. It has no idea which pause was the good one.
Noise removal. Traffic, wind, a fridge humming under an interview. The step people get wrong is pushing it until the hiss disappears and the voice goes with it. Clean enough is the target. A slightly imperfect track that still sounds human beats a silent room with a robot in it.
Reframing to 9:16. The AI tracks a face and keeps it in frame. The step people get wrong is checking only the face. It does not know that the product in the hand, the logo on the shirt or the second person in the argument matters. You check every cut by eye.
Object removal. A cable, a bin, a light stand. The step people get wrong is removing something that was casting a shadow, and leaving the shadow behind. Check the frame either side of the cut, not just the frame.
Voice cleanup and isolation. Separating a voice from a noisy room. The step people get wrong is using it on a voice that was recorded badly enough that isolation makes it thin and strange. Isolation rescues a good take in a bad room. It cannot rescue a clipped microphone.
Notice what those jobs have in common. None of them decide anything. They remove labour. That is the whole argument, and it leads directly to the mistake that stalls most people.
The step people get wrong
They treat the AI output as a finished cut. The machine gives them a sequence, subtitles, a cleaned track and a vertical version, and they export it. It looks finished. It sounds finished enough. It is not.
Pacing is the first casualty. An AI assembly has no feel for when to hold and when to cut. It does not know that the pause before the answer is the whole reason the interview works. Sound is the second. A cleaned track can be technically clean and emotionally dead. Story is the third, and the biggest. The machine does not know what the piece is about.
The fix is boring. Watch the full pass with the sound off and see if the story reads. Then listen with the screen off and see if it holds. Then watch it once as a stranger would, without stopping to fix anything, and write down where you got bored. That list is your actual edit.
A first pass is not a cut. It is raw material that happens to be in order. The human eye on pacing, sound and story is the part that cannot be bought, and it is the part a free learner can build faster than any paid student, because they are running it on real deadlines.
Which raises a question nobody asks early enough: what are you cutting, if you have not shot anything?
Shoot something small yourself
AI editing needs footage, and the footage you shot yourself teaches you what the AI cannot fix. The machine can cut around a bad frame. It cannot make a boring subject interesting, and it cannot rescue a shot that was never framed.
I did this with a piece called "Forest", a B-roll montage I shot to test a new camera. No interview, no script, no client. Just the forest and the lens, and the whole exercise was whether the images held together once they were cut.
That is the exercise I would give you. Five minutes. A phone is fine. A small camera is fine. Walk somewhere with light and texture, shoot twenty or thirty short shots, and cut them to music. You will learn more in that afternoon than in a week of tool tours, because every decision is yours and every mistake is visible.
The camera does not matter here. I have shot on a Sony FX3, an FX30, an A7S III and a Fujifilm X-E5, and I have had as much fun with a tiny keychain camera I bought in a blind box at Clark airport on the way to Coron. The lesson is the same on all of them: you learn what a frame can hold by putting frames together.
And the first thing you should finish with that footage is not the montage. It is something smaller and more useful.
Subtitles are the fastest win
Auto transcription plus subtitle burn-in is the first complete AI workflow a beginner can finish in an evening. It has a start, a middle and an end, and you can hold the result in your hand before you sleep.
Here is the sequence. Bring the clip in. Run auto transcription. Read the transcript and fix every name, number and piece of jargon. Then style the captions: pick a font, set the size, set the position, and be consistent. Then review line by line against the picture, because the timing will drift on fast speech. Then burn in or export the subtitle file, depending on what the client needs.
Why this first? Because it is the workflow where AI does the most work and you do the least guessing. It is also the workflow that produces a portfolio piece the same evening. A short interview with clean, well-styled subtitles is a real deliverable. It is the kind of thing a small business, a nonprofit or a friend with a podcast will actually use.
The step people get wrong is styling. They leave the default captions, which look like a phone, and the piece reads as amateur before anyone has heard a word. Ten minutes on the caption style is the difference between a clip and a cut.
Once captions are done, the next win is the one that turns one shoot into three deliverables.
Reframing for vertical
The 16:9 to 9:16 auto-reframe is the second win, and the second place people get lazy. The AI tracks a face across the frame and keeps it centred. That is genuinely useful, and it is not enough.
Open the auto-reframe, let it run, and then watch the vertical version from start to finish without looking at the wide. You are checking for the things the tracker does not understand. A hand holding a product that drifts out of frame. A logo on a shirt. A second person who is part of the exchange. A caption that now sits over a face.
Then keyframe the ones that matter. Auto-reframe is a starting position. The final position is yours.
This is where a lot of free learners discover they need to shoot differently next time. If you know the vertical is coming, you leave room in the frame and you shoot a little wider than the wide. That lesson costs nothing to learn now and saves a reshoot later.
Picture is the easy half. The half that decides whether anyone watches to the end is sound.
Sound before picture
Spend your second week on audio, because bad sound kills a cut faster than bad colour. People will forgive a slightly flat grade. They will not forgive a room that hums through an entire interview.
The two tools worth learning first are noise removal and voice isolation. Noise removal takes a constant sound, like traffic or a fan, and reduces it. Voice isolation separates a voice from everything else. Learn them on your own footage, not on a demo clip, because the failure modes only show up on a real voice.
The step people get wrong is over-processing. They push the sliders until the noise is gone and the voice has lost its body. The test is simple: play it on a phone speaker, then play it on headphones. If it sounds thin on one and strange on the other, you have gone too far.
There is a limit worth naming here. If the original recording clipped, no amount of AI cleanup will bring it back. That is a shooting problem, not an editing one, and the fix is a better microphone and a quieter room next time. This is exactly the kind of thing a paid course will not teach you, because it is not a button.
So how do you actually learn these buttons, given that every one of them has a tutorial?
Two ways to learn the same button
The same tool, learned two ways, produces two different editors. Watch it done. Then do it yourself on footage with a specific problem.
Way one: you find a general tutorial on voice isolation. It is well made, it is twenty minutes, and it explains what every control does. You finish it feeling informed. You do not open your project.
Way two: you have an interview with a fridge humming under it, you have until Friday, and you search for how to remove a hum in Resolve. You find the same feature, you apply it, you listen, you adjust, you export, and you hear the result on a phone. You finish it knowing what the control does to your footage.
The difference is not the tutorial. It is the problem. Way one gives you information. Way two gives you a result and a memory of the result.
So use both, in that order, but never let way one run longer than the problem it serves. Watch enough to understand the control, then close the video and open the timeline. If you cannot remember how it worked, watch the thirty seconds again. That is the whole method.
And once you have a result, you need someone to tell you the truth about it.
Build a free feedback loop
Getting watched by someone honest is worth more than any certificate. A course grades you against a rubric. A stranger grades you against their attention, which is the only grade that matters.
Post the cut somewhere people can watch it. Send it to one person who will not flatter you. Then ask one specific question, not "what do you think?" That question is useless. Ask "where did you get bored?" or "did you understand what the piece was about by the end?" or "did any part of the audio make you want to stop?"
Then watch where attention drops. If you can, watch them watch it, or check the analytics if it is posted publicly. The moment they reach for their phone is a data point. The moment they rewind is a better one.
The step people get wrong is asking a friend who loves them. They get a compliment and learn nothing. Find someone with no stake in your feelings. A local filmmaker, a film club, an online community where people actually critique. One honest note is worth ten kind ones.
Do this every cycle, not once. The loop is the course.
But the loop has edges, and it is worth being clear about them.
What free will not teach you
Free tutorials will not teach you set etiquette, how to direct a subject, or how to price a job. Those are learned on set, with people, over time, and no video can compress them.
Set etiquette is the unwritten order of a shoot day: who speaks to whom, when to move, when to be silent, how to hand over a card. You learn it by being on a set with a crew that already knows, and by watching how they handle a difficult moment.
Directing a subject is the same. You learn it by watching someone who can put a nervous person at ease, and by doing it badly a few times yourself.
Pricing is the third. What a job is worth depends on the market, the scope, the client and the risk. A local production house or an experienced producer knows their market better than any tutorial. And what I say about being paid is practical experience, not tax or legal advice. On tax treatment and withholding, the client's finance team and tax advisers are the authority on their side, and my chartered accountant on mine. No editor's tutorial substitutes for either.
If you want to learn the craft itself, the honest answer is to hire a production house or a crew for a day and work alongside them. Watch how a shoot day is run from call time to wrap. That costs money, and it teaches things no free tier will.
The money you are not spending
Redirect the course fee into the two things no course can give you: footage you shot and a finished cut. A certificate proves you attended. A hard drive full of your own footage proves you worked.
A small hard drive is the first spend. You will fill it, and filling it is the point. A decent microphone is the second. Bad audio is the most common reason a beginner's cut feels amateur, and a modest microphone fixes more of that than any plugin.
A day of shooting is the third, and the best. Take the money you would have spent on tuition, hire a small space or travel somewhere with light, and shoot for a day. The footage you bring back is the raw material for the next few weeks of learning.
The step people get wrong is buying gear before they have a project. Gear without a deadline is a hobby. Gear with a deadline is a kit.
Which brings us to the shape of the whole thing.
Run it as a loop, not a course
There is no fixed syllabus here, and that is the point. The order matters more than the dates. Take one piece of footage, and work through the same stages on it: subtitles, audio, reframe, rough cut, colour, delivery.
Do not move to the next stage because a week has passed. Move when the current one is finished and you have watched the result on a phone. Some learners will clear a stage in an evening. Some will take a fortnight on audio alone. Both are fine. The loop is the unit, not the calendar.
When you reach delivery, get feedback, and then run the whole loop again on new footage. The second pass is faster than the first, and the third is faster still, because you are no longer learning the buttons, you are learning the judgement.
Common questions
Which free tools are genuinely free?
DaVinci Resolve's free version is genuinely free for most work, and it is the one I would start with. CapCut's free tier is real but limited, and some features sit behind a subscription. Premiere is a trial, not a free tool, and it expires. Runway and Descript have free tiers that are useful for learning a specific feature, not for finishing a project. Read the export limits before you commit a week to any of them.
Will AI replace editors?
It will replace the labour inside editing, not the judgement. The jobs I listed above are the kind of work that used to take hours by hand and now takes minutes with the machine. The decisions about pacing, sound and story still belong to a person, and that person is who clients are really hiring. Learn the tools so you are not the one doing the labour by hand, and learn the judgement so you are not replaceable.
How do I show this work to a client?
Show the finished cut, not the process. A client does not care which button you pressed. They care whether the piece works. Keep two or three short pieces that show different strengths: one with clean subtitles, one vertical cut-down, one piece with strong sound. Put them somewhere a client can watch in under five minutes.
Do I need a powerful computer?
You need a computer that can play back the footage you actually have, at a resolution you actually need to see. Set the timeline resolution lower while you edit, use proxies if the footage is heavy, and render at full quality when you deliver. Most learners blame the machine when the settings are the problem.
How long before I can charge for this?
When you can take a piece of footage from someone else and return a finished cut they are happy to publish, you can charge. That is usually after a few loops, not after a certificate. The first paid job is often small: a captioned interview, a vertical cut-down, a short event film. Take it, finish it, and let the next one be bigger.
Before you open another tab, open your drive instead. Find the one clip you have been meaning to cut for months, pick the person who will watch it, and put a date on it.